The world is a happier place with happy girls so I decided to share a tutorial on how to make 'em.
Here is what you need:
A cutting mat, a cutting knife, a ruler, hemp thread,
3mm thick felt, doublesided tape (2cm),
wooden bead (12mm), scissors and a thin black liner.
A cutting mat, a cutting knife, a ruler, hemp thread,
3mm thick felt, doublesided tape (2cm),
wooden bead (12mm), scissors and a thin black liner.
 Put doublesided tape (2cm) on the felt.
 Cut with a liner just below the doublesided tape.
  Cut a piece of the hemp thread 7cm or 3 inch long.
 Cut a piece of hemp thread 20cm or 8inch long.
 Tie knots on the ends of the threads.
 These are the hands and feet.
 Fold the larger hemp thread in half and
 slip the wooden bead over the end.
 Tie a knot about 1cm or half an inch from the top.
 Cut the felt in the shape of a dress:
 more or less 1cm or half an inch on the top and going wider on the bottom.
 Cut a second piece of the dress.
 Remove the doublesided tape.
 Place the body and arms on top of the dress.
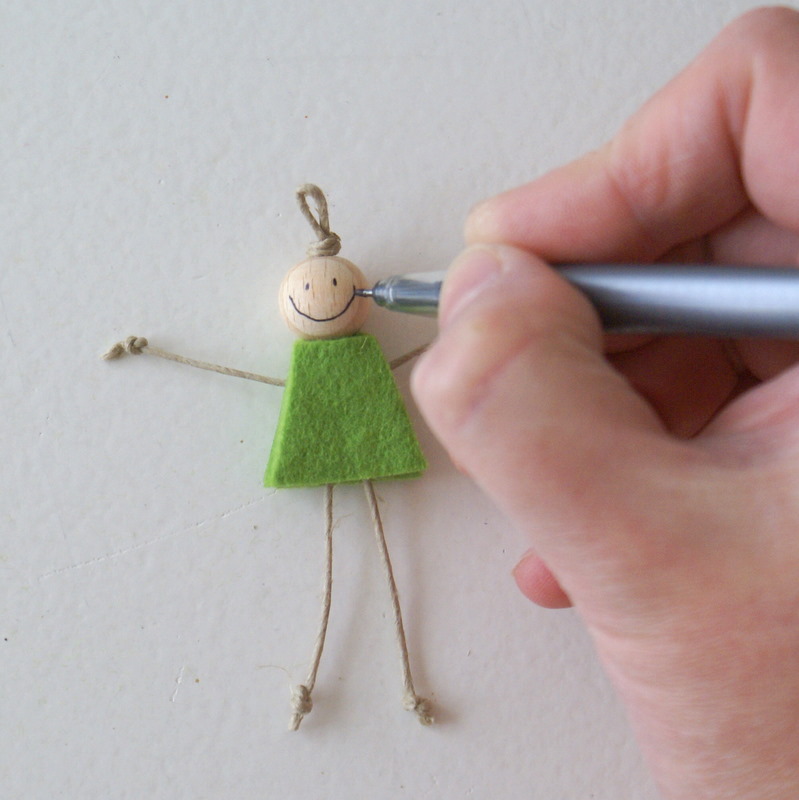
  Place the second piece of the dress on top of the other piece of felt.
Draw a happy face. :)
 And if you're in a productive mood,
you can make a mountain of happy girls.
 In case you are a returning customer in my shop and prefer another color of happy girl when ordering, please don't hesitate to specify the preferred color. :)
Orders placed for my collaborative work with Anna (LilaRubyKing) receive an olive colored happy girl.
Goodmorning with green super ladies ;))
ReplyDeleteCool and beautiful
Have a fun sunday =)
thats a hilarious picture. It would make a good postcard!
ReplyDeleteI love how 'simple' these are to make once you know how. And yet, I'm still wondering how long it took you to make all of those in the photo?!!
ReplyDeleteThanks for sharing this.
:-)
And one more thing about happy time :)
ReplyDeleteIkabags HAPPY BAGS ! Glad to see your smiling face!
Now this words I am writing in my shop anonce ,
Life is not to easy but everytime we can find some gergeous detail for t be happy :))
Sorry again my poor english :(
Here's another idea I can use for my workplace. :) Thanks!
ReplyDeleteI loooove the mountain of happy girls - great fun! :)
ReplyDeleteI looove your happy girls. It's good to know I could make them myself, but I still perfer yours :D
ReplyDeleteHave them everywhere. At work, at home ... :)
I love your happy ones =D and that last image is awesome!!! =)
ReplyDeleteCute girls!
ReplyDeletewhat fun and so cut - you are so kind :-))))))
ReplyDeleteMitsy,
ReplyDeleteyour just the Best in showing
how to,
FANTASTIC!!!!
Mitsy, fun & fabulous, you're the best!
ReplyDeletethat 'happy girl' mountain has to be one of the cutest things i have ever seen! (^_^)
ReplyDeleteChloe x
Oh these are wonderful :)
ReplyDeleteNatasha
Ab.fab. mountain of happy girls.
ReplyDeletegrt. Helmi
You are really something Mitsy!
ReplyDeleteThey are so sweet! What a lovely idea!!
The mountain of happy gilrs is incredible! I love this photo :D Thank you for sharing great tutorial :)
ReplyDeleteThey're really cute! :D
ReplyDeleteIk vind je happy girls helemaal geweldig. Ik ben een trotse bezitter van een happy girl. Hij hangt in mijn atelier op het inspiratiebord.
ReplyDeleteYour little green happy girls have me me very happy this Sunday morning.
ReplyDeleteHow generous you are with your various instructions! Each of your tutorials just makes me want to start a project myself ... and sometimes I actually do get started.
Thank you. xo
I adore that big pile of happy girls! What a nicely written and photographed tutorial.
ReplyDeleteSimple, but extremely effective girls. And a super tutorial to boot!
ReplyDeleteSo cute! I'll try that with my son teva. Thanks!
ReplyDeletethey can make anyone smile :)
ReplyDeleteThank you Mitsy! I can't wait to try it! - Yu-Ting
ReplyDeleteDear Mitsy,
ReplyDeleteit's great that you share this tutorial!
What is the size of the wooden beads you use?
Greetings from Waterfleet,
Vera
Hello Vera, the size of the beads I use is 12mm but sometimes I make 'em bigger or smaller. You can just adjust the 'dress' as you go. :)
ReplyDeletewow... wonderful mountain of happy girls!!
ReplyDeletehugs eli
Aww, I love her! And the lime color is so fun and happy. Thanks so much for this, I'll be linking.
ReplyDeleteThis is brilliant!! Thank you so much for this tutorial Mitsy! :D
ReplyDeleteI love this happy girl! And I'd really love it if you'd bring her to my crafty international blog linking party Sun-tues! Hope to see you there!
ReplyDeleteI love your happy girls so much! Thank you for teaching us how to do them :)
ReplyDeleteI share mine with friend, they're so cute!!!
Thank you! Bellissima idea e bellissimo tutorial! Ciao pia
ReplyDeleteOh my!!! That is one big mountain! Remember those two happy girls you included with my package long time ago? I am using one of them as a "charm" for my USB stick :-) I think of you every time I use it.
ReplyDeletewaw.. so cute! I'll make it soon :D
ReplyDeleteAdorable. I am going to make a few to embellish my daughter's shirts!
ReplyDeleteI am just fascinated by your happy girls, they are adorable!! I want to make some too, but because I only have boys in my house, I think I might make some happy boys instead. :)
ReplyDeleteWhat a darling memento. I'm sure I'd appreciate such a thoughtful touch.
ReplyDeleteLook at all the happy, happy girls! You always make me smile!
ReplyDeleteMichelle-
thanks so much for dropping by Craft Schooling sunday! I'm going to share this with my readers and can't wait to try this with my kids, I think they can make the clothes!
ReplyDeleteI LOVE life simple, sweet and fun XX!
ReplyDeleteThose are SO cute!!!!!thank you fot the TUT ;)
ReplyDeleteI love you for given away the idea to us all. That is the most generous thing I have seen for long.
ReplyDeleteI love them, and I got so happy when you send me a package and they were in.
These are the most adorable little dolls! Thank you so much!
ReplyDeleteMaggy
These are just adorable Mitsy :) Thank you so much for sharing how you made them. I'm off to create some with my daughter today as I'm sure I have some double sided tape and wooden beads for heads *grin*.
ReplyDeleteHope you are doing well! I haven't had a chance to pop over for a bit I'm going to have to catch up on the fun things you've been up to :)
wooooow, great !!!! congratulations! my little girl will love it !
ReplyDeleteThanks for the tutorial! I found your blog from The Crafty Crow. I posted a picture of my finished ones here. http://sewmanygirls.blogspot.com/2010/11/ornament-swaps.html
ReplyDeleteHello!! ;)
ReplyDeleteI do love your blog and your tutorials! ;)
And I put and my blog the happy girl tutorial for my friends to see how much is easy to make and how fantastic is to know person like you with this generosity heart! ;)
Nice to meet you!
Poliane Latta
http://casaeidea.blogspot.com/2011/08/lembrancinha-bonequinha-feliz.html
---
casaeidea.blogspot.com
rumorejo.blogspot.com
So cute! i love it, thanks for sharing.
ReplyDeleteHi!
ReplyDeleteI casually found this surfing through the www. They are so lovely! Even good to make with kids! Thank you for sharing!
Greetings from the cold Berlin, Germany!
Susana.
Adorable! These would make cute earrings :). Thank you for sharing your art and tutorial and of course, spreading the happiness. Best to you!
ReplyDelete