This time about plaster carving. It's such a simple way to reach wonderful results. It's especially a very fun activity to do with kids.
Here is what you need: wine corks, nails, a piece of plaster, a piece of tracing paper, a pencil, a nice drawing and if you have 'em, all kinds of cutting tools like lino cutters, knife,...
 I'm terrible at drawing, honestly, if I would draw a pig, you probably would think it's a monkey.
So, I often use other people's art to help making what I want. This time I'm using AnnaRubyKing's printable colour in pages. I chose to trace the branch with a pencil onto tracing paper.
 Then I turn around the tracing paper and I rub with a pencil the drawing onto the piece of plaster.
 This is the result:
 There are several tools that you can buy especially for plaster carving but if you are only going to do this once in a while, why don't make your own tools?
You need some nails, wine corks and a hard surface for this. Put the nail with the sharp side into the cork and press firmly. Now you have a hole.
 Then take out the nail and press the head of the nail into the hole. This is a bit hard but if you press it onto the hard surface it's easier. Now you have a handy grip to carve into the plaster.
It's much safer too if you work with children. You can also put a needle into it, this makes very fine lines.
 These are some of the tools I use. The branch like tools are handmade too from nails and hazelnutbranches. They are very handy but a bit more tricky to make.
 Outline the lines of the drawing with a sharp knif or needle. You will have to blow lightly to remove the excess plaster so you can still see your drawing.
 Then create some depth into the plaster. I used a lino cutter to do this.
 OK, my branch looks slighty different then Anna's drawing but I like it!
 With a pencil, I added some lines into the plaster and with a handmade cork-tool, I'm going to carve the lines slightly deeper into the plaster.
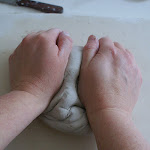
 Then I'm going to press a piece of clay into the carved plaster and see if I'm satisfied with what I just made.
 I take the clay away...
 Jip, I like it! If not, you do some more carving and repeat these last two steps.
 I tear away the sides to get rough edges and make a hole into the pendant with the lino cutter.
 Tada! Let it dry and fire it in the kiln. If you don't have a kiln, you can do this also with polymer clay, papier mache or air drying paperclay.
 Have fun carving your own plaster!