Showing posts with label color. Show all posts

Tuesday, April 22, 2014

Definition of happy?


Definition of happy? Cookies, color and creative people. :)
Setting up the table for the workshop 'transfers' this afternoon.

Sunday, April 21, 2013

Workshop working with transfers

The first workshop 'working with transfers' filled up really fast so I added another date to the calender. On Tuesday 25th of June from 1pm till 5pm. If you want to participate, please send me an e-mail.
In the mean time, I've been preparing a bit for this workshop and made a few examples. If you don't design your own transfers, we work with colored sheets and make a collage on existing tableware.
I went to the secondhand shop to gather some pieces. It was so much fun to make 'em totally different.
These pieces are not fired yet so the colors will be different when fired. So curious how they will come out of the kiln. I especially liked the penguin on Julie's plate. She's supposed to turn lime green. And the fondue dish will make a nice painting dish when she will be bigger. Can't wait to get crafty with her! :) I hope she will take after me when it comes to creativity...

Sunday, January 27, 2013

Happy production

I made a big batch of Happy girls for the Fashion Museum in Hasselt. They have a jar of them in the museum shop and every time when there's a new exhibition I go and fill up the pot. Most of the time, all happy colors have dissapeared so I made more of those this time. It's a happy job to do. :)

Friday, September 21, 2012

Art journaling

For years and years I've been frustrated that I can't draw properly. At least, that's what I tell myself. Of course I can draw but I don't think it looks really good. It doesn't look like all the artists that I admire in their drawings. But then, each has his/her own talent, right?
When I have an idea, I do see images in my head on how it should look but to transfer 'em onto paper is another thing.

I remember when I was in art school, the teacher insisted that I would draw my idea onto paper even though she already understood my idea while I was explaining what I was going to do/make. She said: 'if you can put it on paper, you can make it'  Hard work for me but it somehow forced me to pick up a pencil and draw...

I love seeing people's sketchbooks and art journals and I wish I had one of my own.
I must say that I often attempted to draw something and I have sketchbooks laying around with only one drawing in them. I always give up somehow.

I started another one, and I have a feeling that I will keep up with it as I want to do this for our daughter Julie. I plan to write & draw stuff about her and her little adventures that she will most definitely have. It's a challenge for me and I will have to learn to be satisfied by the fact that my drawings are not quite as they are in my head... but I still want to capture all these precious moments so I think it's worth it!


Do you keep a journal or have you attempted art journaling?

Saturday, November 12, 2011

Organize your art

When I came across the work of Swiss artist and comedian Ursus Wehrli I got instant happy. His 'tidy up art' is funny and clever and it reminds me a bit of I myself try to organise things sometimes...


For those who know me a bit better, they know that I'm very color sensitive. V.E.R.Y.
And even though I can be very messy, I love everything organised, lined up or piled up neatly.
You can call me freaky but I tend to organise by color: white, yellow, orange, red, pink, purple, blue, green, black. And it always makes me happy to see a lovely rainbow of color whenever I finish. Even when there are only 3 or 4 colors, they will always be put in the same color order.
I think it makes life happier. I actually applied Ursus technique to my happy field. :)


Don't you get instantly happy from that? I do!

Talk about organised, my partner and I sometimes discuss how much easier it would be to shop by alphabet. Since I don't do the shopping around here, I make lists. I try to make the list in that way that my partner can go into the shop and grab everything as he goes. But it would be supercool if we could just make our list in a spreadsheet, sort it by alphabet and go to the Alphabet-shop. :)

Saturday, January 23, 2010

Dream in progress... part 19

OMG, I can't believe that this dream is finished!
Jip, really & totally finished. I'm so proud of you because without you guys cheering me on every time I posted about my Babette blanket, I couldn't have done it.
I can recommend anyone that starts a large crochet project, to blog about it and show processes as that's a drive to actually complete it. At least, that was what is was like for me.
I was determined to show something the next week & I often did.
I did take a few breaks from it as it does tend to get rather boring crocheting the same squares all the time. Even though the use of different colors does not make it less boring, the stitches are all the same so it's like crocheting on automatic pilot really.

So, that said, I want to share some facts with you...
  • I crocheted this blanket with 2 threads of cotton 8 yarn.
  • I used 23 different colors.
  • The blanket weighs 1,5 kilo or 3,30 pounds.
  • Each ball of yarn weighs 50g so according to the weight I used about 30 balls yarn.
  • The cost is approximately 50 euro or 70 dollars.
  • It took me about 13 weeks in total to finish it completely (it took me longer in time but I took some breaks)
  • I did curse quite a few times - especially when sewing the blocks together.
  • It measures 1,20m by 1,30m or 47,2inch by 51,2inch
    I perferred having it a bit larger but that would mean I had to make more blocks & it fitted nicely over our couch so I found the perfect excuse not to make it larger.
  • 5 of my Babette images got explored on Flickr. Jippee!
And now are you ready for the result?
So now excuse me while I go relax under my blanket for the rest of the weekend! :)

Monday, December 14, 2009

European Streetteam Challenge entry

Last week I won the European Streetteam challenge & I had to pick a new theme for the week.
It was no surprise that I chose 'babushka's' as a source of inspiration I suppose.
Anyway, while I was sick, I decopatched on the couch as not to feel completely useless. Here is my entry for the challenge:I listed the one above in my shop & will list the other ones later this week!
Go look at all the marvelous entries here! I'll pick a winner tonight! :)

Saturday, November 21, 2009

In between project...

Still didn't get my red yarn for finishing off my Babette Blanket and don't feel like starting my ripple blanket yet until my Babette is finished.
So I've been doing some in between projects. Last week I made and send some granny squares for the European Streetteam project-blanket initiated by Baahar.
Did you know that making granny squares is addictive? I just couldn't stop.... so I decided to make 'em until I get my red yarn. I've been wanting to make a granny square blanket for a long time so this is just a start. I'll pile 'em up and see how far I get - don't even know how many I need to make a blanket really. I only have 9 by now... not even enough to cover my feet! :)

Monday, September 21, 2009

New in my shop...

... in case you are more one of my blog visitors then one of my shop visitors...
I listed these last week and they make me happy because they add a touch of color to my shop. :)

Sunday, August 30, 2009

How to color clay?

Sometimes it's fun to work with clay in a different color. Clay however does not come naturally in many different colors so you can color it yourself with pigments or body stains.
For the European Streetteam challenge I wanted to make some bats so I needed black clay & decided to make it myself.
Here is what you need:
Black body stain, a mask, a scale, gloves, white/grey clay, paper
Weigh the amount of clay you want to color.
Put a piece of paper on your scale and weigh the amount of body stain you want to add.
For black I use more then other colors because I want to make sure it's really black and not a greyish black. I used 4 grams to 200 grams.
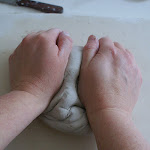
Put on your gloves and make a little bowl out of your lump of clay.
(my apologies for the bad quality of these pictures)
Put the body stain in the little bowl.
Fold the bowl close and start kneading carefully so that not too much body stain falls out.
When the clay starts getting too dry, add a bit of water and knead well so that the body stain really mixes with the clay.
This is how it looks when it's ready to use.
Clay dries out really fast, so I usually hold it in a plastic bag and I wrap the part that I'm working with in a damp cloth.
I use a mould that I made to make the bats.
Take a little clay and press it into the mould.
Make sure that it's filled up nicely.
Take a piece of moist clay and press it onto the filled mould and 'pull' the bat out.
I think it came out nicely.
Hey look, small and big ones! :)
And here is how they look when they are fired.
Hey, they turned out grey instead of black! :(

I definately need to use more black body stain next time.
Well, that's what experimenting is all about! :)
Do you want to see how the colored glaze came out? Check it out here! :)

Wednesday, August 26, 2009

How to make colored glaze?

The easiest way to get a glaze is buy a ready made one in your ceramic supply shop. For those who like to experiment a bit more, you can mix 'em yourself.
That's what I often do. It's a bit more work but it's cheaper and the surprise is bigger when you open the kiln! :)
I never tried to make a red glaze yet so I decided to try if it would work with red iron oxide.
Here is what you need:
Transparant glaze powder (also that you can make yourself but at the moment I use ready made), oxide/pigments/stains, a sieve with a very small mesh, water, containers with a tight lid, a protective mask, a brush, a spoon, some paper and a scale.I usually make small amounts so I can make a test tile first. Weigh 100gr of transparant glaze powder.
Then add pigments, body stains or oxides. All three have a different effect on the color. While the result of pigments or body stains are more obvious, the use of oxides is less predictable. So sample tiles are in order before making large amounts.
I usually take 3 or 5 grams to 100 grams of transparant glaze. For the red glaze I'm trying to make right now, I'm going to use red ironoxide and I take 10 grams to 100 grams of glaze because I'm afraid that I will get a pink result if I use less.
Put a piece of paper on your scale and weigh the pigment, body stain or oxide on the paper.
Then add the color to the glaze.
Add water & mix the glaze.
Then put the glaze through the sieve in a container. Using the sieve prevents lumps and makes sure that the color is mixed well with the glaze. I use my brush to push it through the sieve.
When you're done, write a label on your container so you know what you mixed.
Then make a sample tile and fire it. If it's too dark, add more glaze to it or a bit of tin oxide (which makes it lighter).
This is the result when it's fired... ouch, not quite what I had in mind! LOL
More experimenting is in order for sure! :)