Showing posts with label belgium. Show all posts

Sunday, February 27, 2011

Selfishness

When I sell feelings, I wrap 'em up in a bubblewrap and place 'em in a giftbox. Then there's always some room left which I fill up with a Belgian chocolate.
Nothing beats sharing the best of Belgium right?
I do have a confession to make...
When I buy the chocolates, there is usually a variety of 'em in the box: dark, milk, white chocolate filled with all different fillings.
And there is always only one like this in the box, and it's always mine. :)

I'm not that fond of white chocolate but this particular chocolate is divine. It has bottom of praline and the filling is strawberry cream and it goes straight to my mouth when I open a new box! LOL
What are you selfish about? :)

Friday, July 24, 2009

How to make a memo clip holder?

By now you must be getting tired of me talking about the craftparking fair in Maastricht... but I made another fun thing I'll be using on my table and I thought I would share it with you! :)
I bought little baskets and will put my items in there. But to show what's inside them, I made memo clip holders so I could clip one of the items on them together with the price tag. That way, people can easily see what's inside and how much it costs.
It's fun & easy to make and most probably you have all the materials at hand.
Here is what you need: plaster, water, plastic icecream container (great excuse to eat icecream), toilet paper tubes, clay, scissors, vinyl glue (white glue - can be wood glue too), wooden lollypop sticks, small and large clothes pegs.
Put with one wooden lollypop stick some glue at the top of the other.
Then put the little clothespeg on the stick and let them dry.
While the sticks dry, you can prepare the bottoms. Cut a paper toilet roll in half.
Add clay around the bottom so that the plaster we will poor into the tube later, can't escape.
If you don't have any clay around, look here for another method of making these.
Make some plaster.
Attach a large clothespin at the bottom of the wooden lollypop stick. This will make the stick rest on the paper toilet tube.
Poor some plaster into the paper toilet tube and put the wooden lollypop stick on top of the paper toilet tube so that the bottom part of the wooden stick sets in the plaster.
Let it set for about half an hour and then take away the toilet tube paper.
The memo clip holder is ready to use!
This is how it will look on my table.
I also made a large one to attach my cards on.
And here a little try out on how my table will look... on the floor! LOL :)
I'm debating if I should paint the wooden wine crates lime to add some color and make the feelings stand out more... any thoughts?

My friend Kerrin from Sigmosaics made some price tag holders inspired by this tutorial.
You just have to go and see them, they are amazingly cute! CLICK HERE!
Share
|

Thursday, February 12, 2009

How to make a double mould?

Moulds are very useful for repetitive tasks for example if you work with polymer, paperclay, ceramic clay, papier maché,...
Making a mould is not difficult, it's just a bit messy so you better have everything you need prepared beforehand.

This is what you need: plaster, empty icecream containers, liquid beeswax, clay, scissors, knife, doublesided tape, tape, modelling materials (only if you mould claywork), plasterlocks, paintbrush, water, towel. Be sure to protect your surface with a plastic tablecloth and wear an appron if you're messy.The most important thing when you make a double mould is marking the exact middle of the object you want to mould.
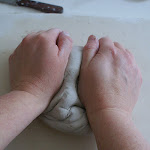
Make a little bed for the object to lay in. I do that by rolling out a piece of clay and draping it around the object.
Then you need to make sure that it closes tight to the marking line by adding clay and making sure that no plaster can go underneath.
It's a very precise task and it always takes me ages...
Done! I'm satisfied with how it looks.
Now there are two ways to make the locks for the moulds. These are plastic ones that you press into the sides. The advantage is that they make the mould more durable. So if you are going to use it often, I advise you to buy some of these.
The second way is to press a round object into the sides of the object. Plaster will go into those and will give you a bump.I will use the mould a lot so I chose to work with the plastic locks.
Build with plastic a tower around the clay and make sure that there is enough clay on the bottom so no plaster can escape.
Pour the plaster into the construction and let it set.
After about an hour, I open up the construction and you see this...
Take away the little clay bed you made around the object.
Then make sure that the object looks all nice and happy again. You can do that by smoothening it with a credit card or a slightly wet brush.
As I didn't do a very good job on the plastic slots, I decided to add some extra clay around it. It won't matter for the result of the mould.
Since you'll be pouring plaster onto plaster, you will need to add liquid beeswax onto the plaster.
Build the little construction again and fill it with plaster.
After about an hour, this is the result.
Oh, and the object is a full lump of clay - it's not hollow inside as the pressure from the plaster would make it go all wonky.
The mould will need to dry very well before you can use it. I put it on the radiator.
It will be great for much future fun! :)
Enjoy moulding if you start and if you have any questions, please don't hesitate to contact me.

Saturday, February 7, 2009

How to do plaster carving?

I love sharing things that I love doing myself, so I made another how-to.
This time about plaster carving. It's such a simple way to reach wonderful results. It's especially a very fun activity to do with kids.

Here is what you need: wine corks, nails, a piece of plaster, a piece of tracing paper, a pencil, a nice drawing and if you have 'em, all kinds of cutting tools like lino cutters, knife,...
I'm terrible at drawing, honestly, if I would draw a pig, you probably would think it's a monkey.
So, I often use other people's art to help making what I want. This time I'm using AnnaRubyKing's printable colour in pages. I chose to trace the branch with a pencil onto tracing paper.
Then I turn around the tracing paper and I rub with a pencil the drawing onto the piece of plaster.
This is the result:
There are several tools that you can buy especially for plaster carving but if you are only going to do this once in a while, why don't make your own tools?
You need some nails, wine corks and a hard surface for this. Put the nail with the sharp side into the cork and press firmly. Now you have a hole.
Then take out the nail and press the head of the nail into the hole. This is a bit hard but if you press it onto the hard surface it's easier. Now you have a handy grip to carve into the plaster.
It's much safer too if you work with children. You can also put a needle into it, this makes very fine lines.
These are some of the tools I use. The branch like tools are handmade too from nails and hazelnutbranches. They are very handy but a bit more tricky to make.
Outline the lines of the drawing with a sharp knif or needle. You will have to blow lightly to remove the excess plaster so you can still see your drawing.
Then create some depth into the plaster. I used a lino cutter to do this.
OK, my branch looks slighty different then Anna's drawing but I like it!
With a pencil, I added some lines into the plaster and with a handmade cork-tool, I'm going to carve the lines slightly deeper into the plaster.
Then I'm going to press a piece of clay into the carved plaster and see if I'm satisfied with what I just made.
I take the clay away...
Jip, I like it! If not, you do some more carving and repeat these last two steps.
I tear away the sides to get rough edges and make a hole into the pendant with the lino cutter.
Tada! Let it dry and fire it in the kiln. If you don't have a kiln, you can do this also with polymer clay, papier mache or air drying paperclay.
Have fun carving your own plaster!