Showing posts with label creative. Show all posts

Sunday, February 19, 2012

The making of... creative

When I first started doing ceramics, one of the first things I did was raiding my dad's tool cabinet. There are such interesting tools you can use to apply texture to pieces and this hole maker has given me much pleasure so far. I use it to make holes into ornaments but also to apply to the feeling creative. When I make 'creative', I usually make a few as it's easier to work in batches. I always start with the biggest circles and last I make the smallest ones.
I always apply my logo and a number on the bottom. Creative is a popular feeling, it's together with curious one of the most bought ones.
The images are a bit off color but that's to blame on the lousy weather...

Friday, July 29, 2011

Merry go round

Every last friday of the month, I jump on the 'Merry go round'. What is the Merry go round exactly? Each month, a group of craftswomen from around the world join together and give their reponses to the same question/challenge.This months question was 'do you take a holiday from your craft/art?
I can't remember last time I took a holiday from my creative work as I always seem to be doing something. It's a constant factor in my life and I wouldn't know any other way really. When I go away on a road trip, even if it's only a short one, I usually take a bag along to assemble happy girls. My hands are always busy and it feels strange if they are not doing anything.
The past weeks have been busy with house chores so my creative time has been limited but I don't see it as a holiday as it was totally not my choice not to be creative. :)
Nearly done with all the house stuff so I hope to be back on my blog sometime soon to share creative stuff again. :)
Want to know if the other Merriers are taking a creative break? Hop over to their blogs. Please bear in mind that the members will be posting at different times of the day, depending on which world time-zone they are in :)

Laura at Blue Terracotta
Monika at Red2White
Ruth at Birdland Creations
Kim at Vilt a la Kim
Sara at Crafts of Texture
Samantha at Vintage is for lovers
Mariana at Florcita
Agathe at Le Bar du Vent
Jen at Painted Fish Studio
Bethany at Dirksen Dabbles

Wednesday, March 2, 2011

Humpday

I wish I was sharing more creative stuff on my blog lately.
Where is the time were I shared creative projects in progress, shots of my table & my crochet endeavours?
The past few months I've been swamped with work which I am really thankful for as it means that things are going well. On the other hand is it making me feel like a little factory as I can't get around to try out new ideas in my head.
Frustrating sometimes but I still love love love what I do.
It's a fun factory you see.

I suppose it's all about finding balance but it's really hard to choose for the work that is already on my plate and not pick the interesting and fun things that are on the table too. I sometimes feel a bit like a child in a candy store...

I am grateful that I can do what I do and that there are so many supportive and inspiring people out there to help me do it.
Yip, that's you that I'm talking about!
So today, here's a little thank you for all your kind words, your thoughts and support.
Thank you for visiting my space, following my work, love what I do & being part of my community. Even if you never comment or 'talk' to me, I know you're out there... :)

Wishing you a wonderful humpday today! :)

Monday, December 20, 2010

Handmade treasures

I have been doing some handmade shopping recently and I quickly want to share my treasures.

Last sunday, Mariana from Florcita showed her work in her small hometown of Susteren, Netherlands. What does a sweet girl from Argentina do in Susteren of all places?
She felts and does ceramics. I wish we lived a tiny little closer so we could play together a bit more often.
I bought this infinity scarf with a twist like the ring of Moebius from Escher.
Fell in love right away so had to have it! It is soft and warm and everything I wanted. And don't you just love the sweet handmade touches? Great branding, Mariana! :)
Something else I'm REALLY excited about is the following: de 'koekpot' (cookie jar) from Elza D. and Annemie. It's a jar with all the ingredients to make cookies: just add butter and eggs and put 'em in the oven. I gave it to my neighbor so I haven't been able to try it myself but I ordered 2 more so as soon as they arrive, I'll make a delicious batch of cookies! Nomnom.
And again great branding: I love the label! Thanks for creating such fun product ladies!
Across my stand on Stiel and Stijl, there was a flower shop stand and this fresh lime green flowerpot from Pot en Papaver is now blooming in my studio.
I bought this little grain pillow for my niece's birthday, she loves soft, warm and colorful things so I thought I hit the jackpot with discovering this. She loved it! You can get 'em at Poembah.
And this pair of crocheted earrings from Nevousinstallezpas is for my other niece who has not yet recieved 'em but I know she will love 'em.
Both my nieces are teenagers with a BIG love for everything handmade so it's really easy shopping for them.
And I bought these for my sister as she loves tiny and black. I love 'em too and had a hard time giving 'em away... Get your own pair at LilaRubyKing's shop. My nieces do not only love handmade goodies but also love reading so I also got 'em these clever and pretty bookmarks from Blue Celeste. Hilde combines handmade Japanese paper with light and leather and all that she makes is made so well that you would want to have it all...
She opened her Etsy shop recently - go check it out!And I'm SO sad that my nieces and nephews are already too big to play with dolls as I love EVERYTHING from tante Hilde! I really do and couldn't resist buying these cute mice although I love her dolls too. Perhaps I should just get a big doll for myself...
If you ask her nicely, she makes you a doll to your liking...Too bad I had to rush my shopping trip on Stiel & Stijl as it was too busy to leave my stand for long enough to stroll around slowly and take it all in. So I'm glad I got to grab a few things at least! I love shopping handmade!

Sunday, July 26, 2009

How to make a tutorial?

This has got to be the strangest tutorial I will ever make. Dotty from TotallyTutorials asked me if I could make a tutorial on how to make a tutorial. While we discussed it we were picturing a tripod taking photos of a tripod taking photos of me working! Haha!
This won't be happening since I only have one tripod, one camera and jip, unfortunately, only one pair of hands... So, this will be more tips & tricks rather then a step by step tutorial. Feel free to add tips in the comments, the more the better! :)

Idea
Of course you start out with an idea you want to make a tutorial about. Don't be afraid of making a tutorial about something that you find super easy to do. It's not ridiculous to post a tutorial about something you have done a million times, someone else might never have heard about it or even seen it.
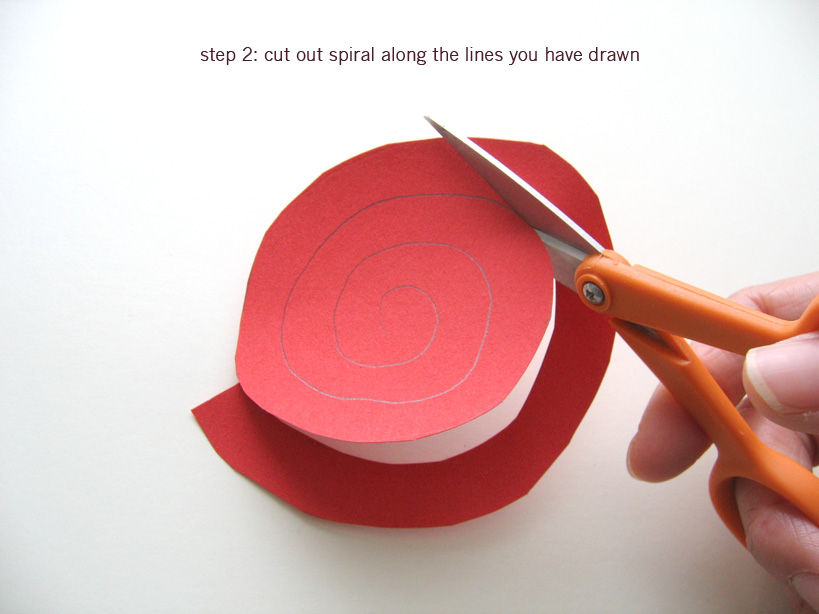
Google your subject and see what's out there already & make your tutorial better and completer. This is one of my favorite tutorials ever, it's so simple yet so effective:
Tripod & Camera
This is the most important thing to have to make a tutorial. People love to see lots of pictures on the subject, preferably close ups. A tripod is essential as you need clear, steady shots. Besides, sometimes you need both hands while making something so you can't hold the camera at the same time.
It's essential to use the timer-function on your camera. I always set it at 2 seconds. That usually gives me enough time to get my hands where they need to be on the picture.
Act as if you are making the subject but keep your hands as still as possible while taking the picture. Preferably, zoom in when you are making something small so that you can show the details. Don't be afraid to make enough pictures as once the process of making is finished you don't want to start all over again because one shot is not good enough to publish. Look at the pictures when you have made one and decide right away if you need more.
Materials
Get all your materials ready before you start making the tutorial. The first picture of a tutorial should always be the materials I think.
That way, people can see right away what they need and decide if it's within their reach.
If possible, try to use as little materials as possible, that way people don't feel like they have to go out and spent a fortune on supplies trying to make what you show.
Think about alternatives. If you don't have lime paint for example, use yellow and green and mix it yourself. This adds value to your tutorial.
Surface & light
Use a non-distracting surface. If you try to show something when the surface is a granny blanket, people won't see what you are doing. Use a large paper sheet, a plastic (no prints) tablecloth, a piece of cardboard, a clean table,... to work on.
Make sure you work in a room with direct daylight as otherwhise your pictures will be dark and not attractive to look at.
Step by step
It's best to take pictures of every step you do when making the subject. If you are uncertain about what they can be, you can write them down beforehand. I ususally just start and take enough pics of all that I do and decide later whether a shot is neccesary or not.
Prepare beforehand what you are going to do. For example, if you are going to make scratch off lottery tickets, skip the part where you cut all the paper. It doesn't add value to your tutorial if you show it as it's obvious that the paper needs to be a certain size.
In case you need to show different steps along the way, while it will take you a while before arriving at step 2, make the steps beforehand. For example, you want to show how to make a granny square. Make steps out of every row you crochet, so that you have a few squares at hand to stick underneath the camera while making the tutorial.Upload pictures & crop
When you are done with all your pictures, upload them to your computer and crop them!
I use Picasa to do this. Picasa allows you to easily make square croppings which is a great size for a tutorial. When you crop a picture, it will also show clearer what you are doing.
You can also adjust the light balance in Picasa. It's a free and easy program to use.
Photoshop is an option too if you know how to use it of course.
Add text to the pictures
Don't make a book out of your tutorial. Keep the text limited to the most essential words. A tutorial should be able to be quickly scanned by the brain without getting too much in detail.
The pictures should speak for themselves rather then you giving a lecture on how it's done.
For example, you use a stamp and stamping pad for something. Just say you use a stamping pad without getting into detail why exactly you use that certain brand or pad. When people have questions, they will leave a comment or contact you via your blog.

Add labels to your blogpost
Once you have everything written down in your blogpost, don't forget to add labels to your post.
The search engines will pick up on the labels and generate traffic to your tutorial.
I have a bad habit not to label my blogposts but I try not to forget when making a tutorial.

Promote
After you have put in all the effort of making your tutorial, of course you want people to see it. Therefore shout it out on Twitter, post a picture with a link on Flickr, start a thread in the Etsy forum, send a link to TotallyTutorials,...
When people like your tutorial, perhaps they will suggest it to other people or blog about it. Never ever copy/paste an entire tutorial, but add a link to the author's blog to give them credit for the hard work they put in. You can find a tutorial on this here.

Just for the record, my blog traffic has increased significantly because of the tutorials I post in my blog. I love blogging and sharing ideas and it makes me happy and content to know that readers out there enjoy perusing my blog for fun stuff to make or do.
I enjoy reading every comment that is left & sometimes it leads to new ideas so keep them coming! :)
There is also a reason why Dotty asked me to do this. She recently started this awesome exchange program on TotallyTutorials. Basicly, supply sellers offer free products to those promising to create a unique tutorial using the supply given.
How cool is that?
Dotty heard from a few people that would like to participate but they didn't know how to do a tutorial... so that's why she came knocking at my convo door.
Make sure to check this out as this is a fantastic opportunity to test new products or techniques and share your knowledge!
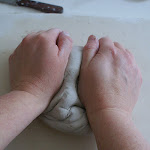
Sunday, July 5, 2009

How to prepare for a craft fair?

You subscribed for an upcoming craftfair? Craftfairs are an excellent way to meet your customers personally. It's also a very direct way to get a response on your products. Meeting your customers is a valuable and inspiring experience. It's important to keep your eyes and ears open when customers visit your stand. Listen to what they say and look how they react at your table. Don't be afraid to talk to them about what moves you & try to get a response on what you love to make.
But before you can enjoy the process of chatting with your customers, you have a lot to prepare.
I have a craft fair planned in August and started to write down a few bits and bobs for myself. In the past, I've done a lot of fairs professionally but I've never participated in a craftfair selling my own goods. This is all new to me and therefor I did some research on the internet and found some great tips & links that I just want to share them with you. Hope this gets you and me ready for a great craft fair.

Plan
Make a plan for yourself a few weeks before you go to the fair. Mark on a calender which days or what time is dedicated to prepare for the fair. Try to stick to this & you'll find yourself much more relaxed & organised.
Make
Decide what you want to take. This often depends on the public that will visit. Often you don't know that beforehand so make sure to take items in different price ranges. Let people have a choice between cheaper and somewhat more expensive items.
If possible, try to leave some room to demonstrate what you are making. People always want to know how things are done. Depending on what product you sell, you can prepare a few things beforehand so you can show the steps or if you don't want to let people in in your secrets, just show them how it is finished off.Take
Don't put too many items on your table. Try to find the right balance on showing off what you have to offer and giving people enough to choose from. A cluttered table is not selling.
Apart from taking your items, you will need some other things to make life easier for you.
Make a checklist on what you are taking. Here is an example
:
  • Pens, markers
  • Paper (scrap and nice paper for signs)
  • Invoice book
  • Scissors
  • Labels and price tags
  • Tape (EVERY KIND YOU CAN THINK OF: double sided, duct, scotch, packaging. If they make it, bring it.)
  • Mini-first aid kit (band aids, pain relievers, eye drops, antacids, etc)
  • Tools (screwdriver, hammer, pliers, wire,zip ties, aka The Crafters Need to Have Supply!)
  • Bags and packaging materials for purchases
  • Apron or waist pouch for change
  • Plenty of change to put in your apron or waist pouch
  • Wet naps and hand sanitizer
  • Water and snacks
  • Calculator
  • Mirrors for customers to use
  • Marketing tools (business cards, folders,...)
  • Displays
  • Tablecloths
Talk
Have an opening line to say to your customers when they visit your stand.
Try to feel if they like it if you talk with them. Some people will hate it and just turn away, others are intrigued if you tell about your process for example.
A great tip that I found in one of the articles: when people compliment on your work, don't say 'thank you' as that is a conversation stopper. Say 'yes, they are great because...'
And don't forget to smile, even though you are not selling a lot. When you are in your stand feeling miserable, people will not want to come by.
This might sound strange if you are not selling food ware, but putting a little tray with something edible on your stand, will make people stick at your stand as bees do on honey.
If you bake something yourself, that can be a great conversation opener & make your customers feel at ease while looking at your items.
Promote
By offering a promotion at your stand, people will be more likely or interested to take you up on the offer. Make your promotion visible & talk about it with your customers. Don't feel afraid to tell them that especially for this craft fair you are wanting to promote a certain item & that therefore, a discount will apply. Be enthusiast about your promotion.
Make it fun at your stand: let people scratch away a lottery ticket or ask if they want to take part in a raffle by letting them guess how many items are in a certain jar or something.
It's a great way to get the conversation going and because it doesn't cost anything, people will most likely participate.
Sell
When it comes down to a sale, make sure to wrap it up all nicely. Don't just chuck it into a bag but add a personal touch to it. Either giftwrap it or add a little freebie (a postcard, a coupon, a button,...) with the sale. It shows people that you care about your product and that you are happy about them purchasing from you.
Selling handmade is selling how much you love what you do so just make sure to show that, it will be highly appreciated.
I know that this how-to is just one among the many on the internet. If you google 'prepare for craft fairs/shows' you'll find plenty of information.
I haven't read all of it but I wrote down what I found helpful. I also recommend to read these two articles from the Storque, Etsy's blog: Rocking holiday craft shows and Seller how-to: craft fair tips They contain so many helpful tips and links that it just will get you ready for the perfect craft fair! Good luck!
Thank you to Maria from Leelabijou who also sent me a helpful PDF file with craft fair tips.

And for those living in or around Maastricht, Netherlands, don't forget to sign up or visit Craftparking on sunday the 16th of August. Lots of EST (European Streetteam-members) will be present and we are already all giddy and happy to meet each other! It's going to be a fabulous & fun experience. Hope to see you there! :)
Share
|