It's not meant for big objects but it works really well for small, conical objects.
Here is what you need:
cutting mat, cutting knife, ruler, scissors, turning table, clay, plaster, plastic, tape, empty container
 First you have to measure the diameter of your turning table.
 Also measure the height from table till the surface.
 Then outline these measurements on the cardboard.
 Cut it out.
 Then draw half of your design onto the cardboard.
 Cut it out.
 This is the result: it will be a little cup.
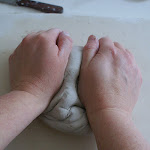
 Then hold the cardboard regularly onto the turning table and add clay in the middle.
 Fill the gap in the middle with clay and turn the turning table a little to see where there are more gaps to be filled.
 Then make it smoother as you go along. I use old credit cards and not valid passes for that.
 Wile you hold the cardboard on one side, turn with the turning table to see if you need to add or take away more clay.
 When you think it's OK, take a fexible rib to smoothen it nicely.
It's important that it's smooth as plaster will take over every little bump.
 Then make a ring from sturdy plastic & place it over the clay cup.
 Add clay along the sides so that no plaster can escape.
 Make the plaster in a container. I always use the pyramid method which means that I add plaster onto a pyramid and when it doesn't soak up any water anymore, there is enough plaster added. Then I mix it with my hand. It has to have a yoghurt like substance.
 Hold your hand above the piece and pour the plaster onto it while your hand guides where it should go.
 Wiggle a bit with the plastic to get airbubbles out.
 Let it set and then remove the clay and plastic around it.
 Then cut away the sharp edges.
 Now the mould has to dry and then it can be used.