Here is what you need:
Tempera paint, a paintbrush, paper bags, a sharp knife, your logo printed onto a thick plastic sheet.
 Cut out the dark part of your logo as that will be the part which will be stamped onto the paper bags. In this case, I cut away the inner and outer circle. Keep your knife as straight as possible. That way you can control the sharp knife on the plastic better.
 Mix some tempera paint to the color of your liking.
 Put the template on the paper bag surface. Since the circles are loose, I'm placing them all inside the bigger cut out circle and take away the second circle.
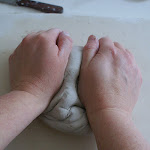
 Hold both circles and dip the sponge with paint over the template. Don't use too much paint as it will go underneath the template. Just little bits. Since the inner circle is loose, I have to hold it and make sure it doesn't move. It's a bit tricky but you can make templates where this is not neccesary.
 Haha, you can see where I held my fingertips on the plastic template.
 Take away both templates and look at the result.
 First I planned to stamp my website address on the bottom but making the template would have taken me forever so I decided to attach a business card on the bag. :)
 Slowly but surely, I'm getting ready for the craftparking fair in Maastricht...
And if you haven't seen my new postcards yet, hop over here and leave a comment, you might win some! ;)
Share
|