I used polymer clay (Fimo) to create gift tags from them. I decided to try white and black and see what the results were.
Here is what you need:
Metal stamping letters/numbers set, polymer clay, acrylic paint, flat wooden sticks, ceramic tiles or glass, cookie cutters, rolling pin, embossing tool or fat needle, paper plate, paintbrush and a cloth.
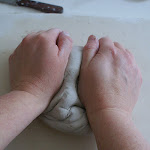
 Take a piece of polymer clay and soften it while kneading.
 Put the flat wooden sticks on the ceramic tile (makes it easier to transfer to the oven) and roll with the rolling pin over the clay so that it's nice, flat and even.
 When you rolled out a piece, lift it up carefully and
transfer it to another tile so you can roll out more little clay slabs.

Punch with your cookie cutters, figures out of the polymer clay slab.
 I made two sets in black and white clay.
 Before you stat using your letter stamp set, wipe it off with a soft cloth. The stamps are a bit oily to make sure they don't start to rust.
 Before you start stamping, try your stamp on a sample of Polymer clay.
This way you know how hard you have to press the stamp to get result and it will also be good to see if you're not holding the stamp upside down.
 Hold the metal stamptool as straight as possible and press lightly into the clay.
 Here is what I stamped...
 If you click on this picture below, you will see better what I stamped on the clay.
 Take your embossing tool or needle to punch a hole in the clay.
 Carefully take the piece of clay off the ceramic tile and punch with your embossingtool or needle on the backside of the clay so that the hole can be used.
 Preheat your oven to 110°C or read the instructions on the packaging of the polymer clay you are using.
 Put the ceramic tiles with the clay pieces in the oven for 30 minutes
and let it cool down afterwards. It's ready to use when they feel cold.
 Put some acrylic paint on a paper plate and paint the sides and front of the clay.
 Let it dry for a while.
 When it's dry, rub it with a damp cloth
so that most of the paint will come off again.
 The harder you rub, the more paint will come off.
 Here is another example with gold acrylic paint. Paint it.
 Rub the paint away with a damp cloth.
 Ready!
 Here are some results on the white and black clay. On the white ones, the paint doesn 't look really good I think but I love the black ones. On the white ones, the paint just looks a bit dirty...
It obviously is best to use this technique with colored polymer and contrasting paint.
 I made a little package with very thin metal wire. I twist the wire around a needle to create a tiny spiral.
 I used chrochet thread to wrap double around the package.
 You can also make it an ornament.
 Wrap lots of chrochet thread around the package and add the clay label.
 Only wrap thread around one edge and attach the clay gift tag.
 In case you have a hard time getting the thin thread
through the little hole, here's a tiny trick that makes it super easy...
Cut a small piece of metal wire.
 Fold the metal thread in half and put the thread in between.
 Stick the metal thread through the little hole of the clay.
 See how easy it is, you don't even need glasses for that! :)
 I love the white, untreated gift tags best, they kind of look like porcelain clay...
 There are lots of possibilities with this metal letter stamp set and I can't wait to use it for my ceramic work too. If you like to try it for yourself, don't hesitate and order a set of your own at EviesToolEmporium. I garantuee you lots of pleasure with it! :)
Michele from EviesToolEmporium also gave away a metal letterstamp set to a jewelry designer who used it to stamp metal. She made a little video montage and it's awesome, you can find that tutorial here.
 If you like to receive all the gifttags that I made for making this tutorial, please leave a comment & you'll automatically enter this give-away. :) There's many more then you see in the pictures!
The winner will be announced next week.
Congrats Evylyn of Sumikoshop! I'll be sending out the gift tags soon! :)