Monday, October 11, 2010

How to make a spooky fingerpuppet?

These little ghosts are super fun to make for kids and adults.
You can keep entertaining and silly conversations between all of your fingers or just use 'em as decoration for you home, table or as a prop in your product listings.
You can whip 'em up in no time and they make great companions so here's what you need:

Plaster of Paris, Vaseline, little bowl of water,
a permanent marker and a plastic bag to protect your table.
Cut strips of 2cm or 1inch of the Plaster of Paris.
Cut a few squares too.
Put some Vaseline on a finger.
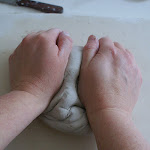
Dip a strip of Plaster of Paris in the bowl of water.
Put a few strips on your fingers.
It will take about 10 minutes to set.
Sit still and relax.
Take off the plaster fingers.
Dip a larger square into the bowl of water.
Place it on top of the plaster finger.Put the finger on the plastic bag and drape the Plaster of Paris a bit.
Let it dry.Draw with the permanent marker eyes and a mouth.
Your ghostly companions are ready for Halloween fun!

Comments (25)

Loading... Logging you in...
  • Logged in as
super lovely dear Mitsy:)
absolutely fun for everyone
great idea ! Looks like a lot of fun to make them !
spooky? i'd say ADORABLE! do you get the plaster at your local craft store?
wonderful idea! and the tutorial is very appetizing to try it !
so cute !
awww those are so cute :D
These are absolutely adorable, Mitsy...but I know you.
How did you manage to sit still for 10 minutes?? Giggle.
This is extraordinary smart idea...waooooo
Super cute! Er, I mean scary!
hi ,
you are just too good, how do you get such wounderful , beautiful and yet easy ideas .
hats off to you , i am your relatively new follower and have learned a lot from your lovely blog ,
tho i havent made anything practically so far from your easy to understand tutorials, but i will be and will let you know too as you desreve all the credit for your all beautiful creations .
great .... keep going .
do visit me some times
greetings
Rachana
super!
:=) *LOL* Cute fellows...
These are brilliantly simple Mitsy! Could you just use a small plastic bag or even cling film over your finger instead of the vaseline? We call this plaster bandage stuff 'mod-roc' - use it in school for sculptures.
I love it :) I'll try it!, Only I have to find Plaster of Paris :)I love it :) I'll try it!, Only I have to find Plaster of Paris :)
ze zijn echt helemaal geweldig!!!!
Great idea, thanks for sharing, infact I am off to the shop right now! I think the kids in my Tuesday afternoon art class are going to have a great time with this thisafternoon I had planned a little origarmi but I am inspired so I'm gonna go with it. Thanks :)
LOVE THEM!!! So cute and (I think) super easy.... I've never been game enough to use plaster of paris, but definately game now :)
Oh my gosh that is SO cute! I love it! Thanks so much, I'll be linking.
They are so cool, I think I will have to grab some plaster of paris on the way home from school to have a little play. Thanks.
Il ove these! And they look like theyd be a lot of fun to make
Thanks for this great 'how to'. I did it with the kids in my Tuesday art class and they loved it. It wasn't hard to add all sorts of details like hats and funny faces too. This week we are going to give our little puppets a bit of colour.

I also discovered that you could speed up the drying process in the microwave. I saw the words microwave safe on the packet and just had to try it out. (Who would have thought?) Be carful because they are really hot though, don't try putting them straight back on your fingers. Not good!
ha that is another cool tut from you,
I really really love it
x
I have two rolls of plaster bandage I bought on impulse two years ago...now I know what to do with at least one of them!
Made these for the kidlet in my daughter's 2nd grade class as part of their goodie bags for Halloween.
So fun to make!!
Thanks for the tute!
Adorable little ghosts, and easy :)
Thank you very much!

Post a new comment

Comments by